Saturday, March 8, 2014

How to test Webservice using SOAPUI tool?

This blog explains about testing simple webservice using SoapUI tool

You need to install SoapUI s/w in order to proceed below blog, You can download this s/w from : http://www.soapui.org/

- Launch 'SoapUI' tool
- Create new 'SOAP Project' - File -> New -> SOAP Project

- After successfully creating SOAP Project, Expand the newly created soap project, you will see all the operations as shown below

-Expand the operation that you want to test, double click on 'Request' , You will see blank SOAP Request on right hand side of the window.
- Enter the required input parameters in the Request, then click on 'Green Color Run' button as shown below, This will invoke the web service and response will be displayed.


Friday, March 7, 2014

How to See messages in JMS Queue in Weblogic Console ?

This blog explains about how to see messages in a JMS Queue in a Weblogic console ?

- Login to Weblogic Console
- Select 'JMSModule' and select the queue which you want to monitor
- Select 'Monitoring' Tab

- Select the queue name and click on 'Show Messages'

- You can view/add new message/ delete existing messages as shown above

How to test OSB Business service from OSB Console ?


This blog explains about how to test OSB Business service from OSB console.

- Login to OSB console, Click on 'Project Exporer' button in 'Operations'
- Locate the OSB Project, which contains desired Business service which you want to test.


- Click on 'Launch Console' icon as shown above.
- Enter the input as shown below and click on 'Execute' or 'Execute Save' buttons.


How to deploy OSB Service ?


This blog explains about various methods to deploy OSB services.

- Right click on OSB project, export as a JAR as shown below

- Login to OSB Console
- Click on 'Create' in 'Change Center'
- Click on 'System Administration' in 'Opeations'
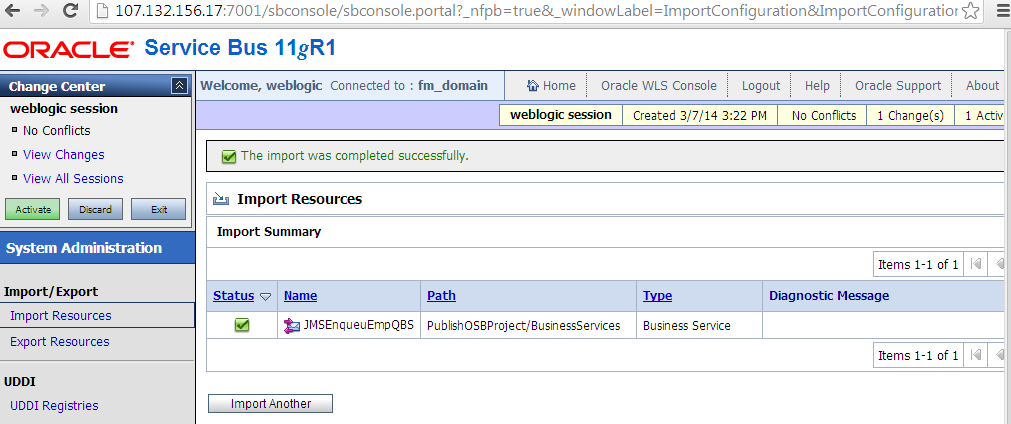
-  Choose the exported OSB Configuration project jar, Select the OSB Project which you want to deploy and click on 'Import' button


- After successful import , click on 'Activate' button in operations
- Click on 'Project Explorer' button in 'Operations' and locate your OSB Project


- OSB Project is successfully deployed to OSB console

How to publish a message into JMS Queue using OSB Process?


This blog explains about publishing a message into JMS Queue using OSB

- Create JMSServer, JMSModule and JMSQueue. Below is list of queues which I have already created. Ensure target server should have OSBServer as target server.

- As we are going to publish/enqueue a message, Create a business service as shown below

- Using OEPE(Oracle Enterprise Pack for Ecilipse) create new OSB Configuration Project

- Create new OSB Project in above created OSB Configuration project as shown below


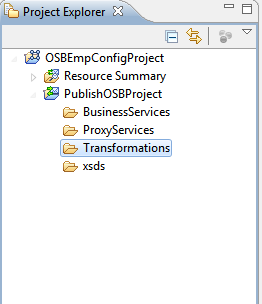
- Create various folders for Business Services, Proxy Services, xsd's and Transformations in above created OSB Project

- Create new business service by right clicking on 'Business Services' folder and choose Business Service, Give meaningful name

- Choose 'Messaging Service' in General tab as shown below

- Based on your requirement choose any of Message type for Request and Response, In this example, I want to publish simple text message, I chosen 'Text' in Request , I don't have any response, so chosen 'None' in response as shown below
- Enter below information in 'Transport' tab
  Protocol - jms
  End Point URI - OSB Server name, Port , Keep the default connection factory as it is , JMS Queue name

- Enter the below info in 'JMSTransport' tab
 - Destination Type - Queue
 - Message Type - Text
 JMS Service Account - If you have any authentication setup on JMS Queue, then use the JMS Service account , otherwise leave this as blank
- If you want to persist the message until the consumer consumes the message then select 'Enable Persistent Message' option as shown below

We are done with creating business service which publish message into JMS Queue.

How to Create JMS Queue and Topic in Weblogic Server


This blog explains about crating JMS Module and JMS Queue
1. Create JMS Module, Here is brief explanation about JMS Module

JMS system resources are configured and stored as modules similar to standard J2EE modules. Such resources include queues, topics, connection factories, templates, destination keys, quota, distributed queues, distributed topics, foreign servers, and JMS store-and-forward (SAF) parameters. You can administratively configure and manage JMS system modules as global system resources.


- Enter the JMS Module Name and meaningful description.

- Choose the server where you want to deploy the JMS Module


- Choose Finish


- JMS Module successfully created


   Creating JMS Queue

Select the JMS Module and click on New button


- Here is brief explanation about JMS Queue


- Select the Queue and click on Next

- Give meaningful name for queue and JNDI. This allows to uniquely identify the resources in a JMSModule

Choose if there is any existing sub deployments created for the JMSModule, otherwise create new subdeployment
- Give meaningful sub deployment name


- Choose the appropriate JMS Server for and click on 'Finish'
- JMS Queue successfully created


Creating Topic

- Follow the same steps as above mentioned , instead of 'Queue' select 'Topic' in a JMSModule

Monday, February 10, 2014

singleton ability in Inbound Adapters

Inbound Adapters have the property to read a file, it can be DB or File.

These adapters act bit differently when deployed to any clustered environment. Usually Performance and Production environments are clustered, in these the adapter will read the file in both the nodes. In order to suppress this behavior, we can add singleton property in composite.xml as follows:

 <binding.jca config="GetInputDetails_file.jca">
      <property name="singleton">true</property>
    </binding.jca>

Thursday, August 15, 2013

Weblogic Tips and Best Practices


- Ensure to take the backup of Config.xml file before making any modifications in weblogic conosle
       MIDDLEWARE/domain/bin/config - Here is the path where you can find config.xml
-  To Start & Stop Weblogic server
        MIDDLEWARE/domain/bin
        ./startWebLogic.sh & - Starts the weblogic server
        ./stopWebLogic.sh   - Stops the weblogic server.

Wednesday, August 14, 2013

How to Start/Stop Weblogic Server

This post briefly outlines about starting/stopping weblogic server in sevral ways.

Start Weblogic Server in Windows

By default, this directory is MW_HOME\user_projects\domains\DOMAIN_NAME, where DOMAIN_NAME is the root directory of the domain. (The name of this directory is the name of the domain.)

- bin/startWebLogic.cmd (Windows)
- bin\startWebLogic.sh (UNIX and Windows. On Windows, this script supports the MKS and Cygnus BASH UNIX shell emulators.)

Starting Weblogic Server from the Windows Startup Menu

- When you create an Administration Server on a Windows computer, the Configuration Wizard creates a shortcut on the Start Menu for starting the server (User Projects > DOMAIN_NAME > Start Admin Server for WebLogic Domain).

How to start Managed server from weblogic console 

- Login to the Weblogic Admin Console
- Environment->Servers
- Click on the 'server' which you want to start/stop


- Choose 'Configuration' and 'Start/Stop' tabs as shown below
- Select the server and click on 'Start/Stop' button.


- If you encounter any warning message saying 'Node Manager is not running associated' then start the 'Node Manager' as explained below

-MW_HOME\wlsserver_10.3\server\bin
startNodeManager.cmd - If it is on Windows
startNodeManager.sh - If it is on UNIX

Starting Weblogic Server using Node Manager

- "Node Manager is a utility for remote control of WebLogic Server instances. Using Node Manager you can control and monitor Managed Servers and also, start, stop, and restart Administration Servers."
- Start Node Manager
c:\>java weblogic.WLST 
wls:/offline> startNodeManager()
- Start WLST
java weblogic.WLST
- Connect WLST to a Node Manager by entering the nmConnect command.
wls:/offline>nmConnect('username','password','nmHost','nmPort', 'domainName','domainDir','nmType')
Example : nmConnect('weblogic', 'welcome1', 'localhost', '5556','fortuneminds','c:/bea/user_projects/domains/fortuneminds','ssl')
- Start Server
wls:/nm/mydomain>nmServerStatus('serverName') 
- Stop Server
wls:/nm/mydomain>nmKill('serverName') 
Ref : http://docs.oracle.com/cd/E12839_01/web.1111/e13715/manage_servers.htm#WLSTG166


Start the admin server:
              <domain_home>/bin/startWebLogic.sh
Stop the admin server:
             <domain_home>/bin/stopWebLogic.sh
Start the node manager:
            <weblogic_home>/wlserver_10.3/server/bin/startNodeManager.sh
Start a managed server:
           <domain_home>/bin/startManagedWebLogic.sh <managed_server_name> http://<admin_server_host>:<admin_port>
Stop a managed server:
          <domain_home>/bin/stopManagedWebLogic.sh <managed_server_name> http://<admin_server_host>:<admin_port>

Sunday, July 21, 2013

How to change the SOA instance state from ? to a valid state


Sometimes I noticed that the SOA suite 11g instance is displayed as Question Mark ("?") which is quite annoying, here is a way to change that setting in the SOA em and capture the proper state of the instance.


·        Right Click on soa-infra domain and select SOA administration > Common properties.
·        Under SOA Infrastructure Common Properties, select Capture Composite Instance State.

How to change the Audit Level for composites in SOA11g ?


It is really useful to turn the audit level in development environment for Testing. SOA11g has 3 levels of audits: Production, Development and Off.

Rightclick on soa-infra domain> SOA Administration> Common properties> and change the audit level to ‘Development’ 


How to display the System Timestamp in XSLT ?


Use the following function to display System Time in XSL with desired format.

<xsl:value-of select="xp20:format-dateTime(xp20:current-dateTime(),'[D01]/[M01]/[Y0001]')"/> - gives the System Date


<xsl:value-of select="xp20:format-dateTime(xp20:current-dateTime(),'  [H01]:[m01]')"/> - gives the System Time

The above XSL functions will display Date Time in the foll. format: 04/10/2009 11:16

How to find the XSLT version that you are using ?


In order to know the XSLT function we are currently working, use the following function:

system-property('xsl:version')

Ex: create a variable and print the XSLT version as follows:

 <xsl:variable name="XSLTVersion">
    <xsl:value-of select="system-property('xsl:version')"/>

  </xsl:variable>

Console urls for most commonly used Oracle Fusion products


Weblogic server console : http://localhost:7001/console

oracle service bus console : http://localhost:7021/sbconsole

Enterprise manager : http://localhost:7001/em

direct url for soa-infra for testing : http://localhost:8001/soa-infra

soa composer for Editing Business rules etc : http://localhost:8001/soa/composer

worklist app : http://localhost:8001/integration/worklistapp

bam console http://localhost:9001/OracleBAM

b2b console : http://localhost:8001/b2b

b2b serices test console : http://localhost:8001/b2b/services

User Messaging Service (UMS) configuration console : 
http://localhost:8001/sdpmessaging/userprefs-ui

Webservice to test UMS : http://localhost:7001/sdpmessaging/parlayx
/SendMessageService

OAM console : http://localhost:7001/oamconsole

Policy manager : http://localhost:8001/wsm-pm

EDN log console: http://localhost:8001/soa-infra/events/edn-db-log

weblogic spy servelet : http://localhost:8001/dms/Spy


How to put and get files using FTP commands ?


Here are some examples to get/put files on a remote machine from local machine via FTP (File Transfer protocol)

Steps to get the files from remote to local machine
- Open commandprompt from AllPrograms in the computer
- Change directory to which you want to put the files on local machine, using cd command (say cd C:\)
- Now connect to remote machine using ftp command (ftp "hostname"), enter username and password.
- Navigate to the folder from which you want to get the files from remote machine using cd command   Ex: cd /Users
- Say mget* and say y when prompted - This will get all the files to local machine (C:\).

Steps to put the files from local to remote machine
- Open commandprompt from AllPrograms in the computer
- Change directory to which you want to put the files from local machine, using cd command (say cd C:\)
- Now connect to remote machine using ftp command (ftp "hostname"), enter username and password.
- Navigate to the folder to which you want to put the files on remote machine using cd command   Ex: cd /Users
- Say mput* and say y when prompted - This will get all the files to local machine(C:\).

- Say mput m* and this will put all the files starting with 'm'.

How to check the source code of a BPEL component in SOA11g EM ?


Here are the steps to get the BPEL component source code from SOA11g em.

- Login to SOA11g em
- Select the corresponding composite and scroll down to components section.
- Select the required BPEL component.
- Click on the blue circle as follows beside the BPEL process and select 'Source' from Definition section.
TestFileConsumer

How to use String tokenize function in XSLT


Here is an example to use String function: tokenize()
Say the csv has element Role seperated by " ; " and we need to translate using tokenize function:

Roles: Supplier;Vendor;Investor

<Roles>
             <Role>Supplier</Role>
             <Role>Vendor</Role>
             <Role>Investor</Role>
</Roles>

XSL Code:

  <Roles>
                <xsl:call-template name="tokenize">
                  <xsl:with-param name="string"
                                  select="/ns0:Role"/>
                </xsl:call-template>
              </Roles>

  <xsl:template name="tokenize">
    <xsl:param name="separator" select="';'"/>
    <xsl:param name="string"/>
    <xsl:choose>
      <xsl:when test="contains($string,$separator)">
        <Role>
          <xsl:value-of select="substring-before($string,$separator)"/>
        </Role>
        <xsl:call-template name="tokenize">
          <xsl:with-param name="string"
                          select="substring-after($string,$separator)"/>
        </xsl:call-template>
      </xsl:when>
      <xsl:otherwise>
        <Role>
          <xsl:value-of select="$string"/>
        </Role>
      </xsl:otherwise>
    </xsl:choose>

  </xsl:template>

How to use if-else conditional check using XSLT ?


Example for IF – ELSE in XSLT

Following XSLT snippet will display a value for attribute:  PwdChange. If the input xml has ChangePwd, it will disply its value, if it is blank it will display a FALSE value.


How to generate a random/unique number in XSLT ?


  <xsl:variable name="RandomNum">
    <xsl:value-of select="orcl:generate-guid()"/>
   </xsl:variable>